Showing posts with label 1:12 scale. Show all posts
Friday, August 8, 2014
I like it!
The nightstand is across the room rather than by the bed but I am happy with the room. I love the beamed ceiling. I decided to stain the floor to match the beams to tie it all together. The bed canopy hides the fact that the headboard doesn't go all the way to the floor. I guess I could have just put legs on the headboard to make it look finished but the canopy suits the rustic meets romance feel of the room.
Update: I adjusted the pleats and gathers and added a piece of paper doily as the centerpiece on the canopy frame. I like the little added touches. The bedroom is beginning to look like I had hoped it would. It needs accessorizing but it already looks cozy and romantic. :-)
Labels:
$8 dollhouse,
1:12 scale,
beamed ceiling,
bedroom,
blue,
canopy,
French country
Wednesday, July 30, 2014
I'm just floored!
Well, not really. But I did finish the living room floor. :-) I decided I wanted it to be lived in and embraced the spots that didn't take the paint and stain. I added rocking chair marks - much like the ones on my floor.
It is hard to see in the whole area photos but the floor has 12 inch wide planks.
I put the trim in where I could and waxed and buffed the floor to give it a soft sheen. I can't do much else in here until I get the stairs in. I don't think the console table will fit under the stairs and I haven't decided what sort of table I want between the chairs. And what about a coffee table? So many decisions left to make. I have to get busy on the rest of the structural details like doors and the hall soon. The bedroom is at a standstill until I get that door in. (I could make the bed, though.) The upper story hall is still completely naked, LOL. And I have to get a door in there, too. No more today, though. I picked and canned two canners full of green beans. I'm ready for some down time.
It is hard to see in the whole area photos but the floor has 12 inch wide planks.
I put the trim in where I could and waxed and buffed the floor to give it a soft sheen. I can't do much else in here until I get the stairs in. I don't think the console table will fit under the stairs and I haven't decided what sort of table I want between the chairs. And what about a coffee table? So many decisions left to make. I have to get busy on the rest of the structural details like doors and the hall soon. The bedroom is at a standstill until I get that door in. (I could make the bed, though.) The upper story hall is still completely naked, LOL. And I have to get a door in there, too. No more today, though. I picked and canned two canners full of green beans. I'm ready for some down time.
Labels:
$8 dollhouse,
1:12 scale,
dollhouse floor,
French country,
living room
Monday, July 28, 2014
But what about the floor?
Well, I don't yet know the answer to that question but I did have time to work on the furniture for the living room. I made the slipper chair from a small hinged jewelry box, wood pieces, batting, fabric and trim. The toile loveseat was made completely from scratch. I am really pleased with it.
A closer view of the loveseat and it's gingham rooster pillow. I made the upholstered valance and the curtains (made from a coffee filter.)
A closer look at the chair with its roll pillow - rolled fun foam with fabrics and trim glued on.
This is a potential living room layout. I'm not sure if the console table will fit under the stairs and I need some side tables and art and ...oh, right, there's still that floor. I think it needs a dark wood floor for balance. I'm still thinking about this one. Ideas, anyone?
A closer view of the loveseat and it's gingham rooster pillow. I made the upholstered valance and the curtains (made from a coffee filter.)
A closer look at the chair with its roll pillow - rolled fun foam with fabrics and trim glued on.
This is a potential living room layout. I'm not sure if the console table will fit under the stairs and I need some side tables and art and ...oh, right, there's still that floor. I think it needs a dark wood floor for balance. I'm still thinking about this one. Ideas, anyone?
Labels:
1:12 scale,
aged plaster walls,
coffee filter,
French country,
gingham,
loveseat,
slipper chair,
toile
Saturday, July 19, 2014
Changes in the wind
If you've been following me for any length of time, you know that I can rarely call something finished and then leave it that way. ;-) Fortunately, my changes are usually improvements and, in this case, that is definitely true. I just didn't like the look of two separate cabinet units when that isn't how they look in real life. So I trimmed a bit here and filled a bit there and painted over it all. Then I used a scrap book trim, filled in the holes with different colors, added a bit of Triple Thick, and called it tile. I added bits and bobs from my stash to blend in any problem areas, and...ta da! Now I should probably finish the walls, flooring, windows, etc. LOL
Hope you are all having a lovely and blessing filled weekend!
Labels:
$8 dollhouse,
1:12 scale,
food,
kitchen,
Michael's hutch,
scrapbook supplies
Am I the only one
...who makes the interior furnishings before finishing the building? I'm not sure why I work this way but I do. It's partially because I like making the furniture best and once that's done I'm more motivated to finish the house. I'm going to try to go back and forth on this house. I did get some of the painting done yesterday and I really like how the living room plaster turned out. Anyway, here are the finished kitchen pieces:
I'm really pleased with how the kitchen cabinets and appliances turned out. Parts of two Michael's hutches, a block of balsa, cardboard, cardstock, beads, woodsies, and stickers got the project this far. Still needed: faucet, backsplash, and a second shelf for over the sink/range area.
This is the baking hutch that I pulled from my zibbet shop. The yellow over red finish makes it perfect for this kitchen. I don't remember where the dog came from but he will be one of the residents here.
I am just playing with layout possibilities here. I hope to make an "iron" headboard. I have fabrics chosen for the bed linens. I don't know if I will leave the rocking chair as is or distress it. Opinions?
The bathroom is really rough at this point. The shelf unit will be finished and wall mounted for towels and other supplies. The tub will be painted and probably have wall mounted plumbing fixtures. I am tentatively planning to somehow use the wash stand as a sink but I think it is oversized so I'd have to cut it down. At this point, the toilet will be completely from scratch unless I stumble on one at a thrift store.
The nursery will keep this walllpaper. I have pink carpet for the floor. The baby needs some work. She's not very pretty, lol. I think lightening her hair will help. She was only $1 at the miniature shop in Holland, Michigan, we visited last month. I figured I could fix her up somehow.

I'm really pleased with how the kitchen cabinets and appliances turned out. Parts of two Michael's hutches, a block of balsa, cardboard, cardstock, beads, woodsies, and stickers got the project this far. Still needed: faucet, backsplash, and a second shelf for over the sink/range area.
This is the baking hutch that I pulled from my zibbet shop. The yellow over red finish makes it perfect for this kitchen. I don't remember where the dog came from but he will be one of the residents here.
I am just playing with layout possibilities here. I hope to make an "iron" headboard. I have fabrics chosen for the bed linens. I don't know if I will leave the rocking chair as is or distress it. Opinions?
The bathroom is really rough at this point. The shelf unit will be finished and wall mounted for towels and other supplies. The tub will be painted and probably have wall mounted plumbing fixtures. I am tentatively planning to somehow use the wash stand as a sink but I think it is oversized so I'd have to cut it down. At this point, the toilet will be completely from scratch unless I stumble on one at a thrift store.
The nursery will keep this walllpaper. I have pink carpet for the floor. The baby needs some work. She's not very pretty, lol. I think lightening her hair will help. She was only $1 at the miniature shop in Holland, Michigan, we visited last month. I figured I could fix her up somehow.
Labels:
1:12 scale,
French country,
kitchen,
Michael's hutch,
nursery
Friday, July 18, 2014
I forgot how much fun it is!
No change in the house tonight but I made big progress on furniture. The nightstand and armoire for the master bedroom - the wallpaper for that room is behind them. These took forever due to the multiple coats of paint I needed to get the effect I wanted.
This wallpaper and border were already in the room. I really like them so I'm going to make this a baby girl's room. Her dresser turned out well, I think.
The kitchen cupboards and appliances before painting - at this point they have a coat of gesso.
The shelves on the counter next to the fridge will be mounted on the wall. The refrigerator is a paper covered block of balsa. The rest was made by bashing Michael's hutches.
This is after the paint treatment for the cupboards. I still need to finish the appliances and countertops. The cabinets need knobs, too.
Farmhouse sink and range in the same unit. There's never quite enough space in a dollhouse kitchen but this works pretty well. I still need faucet, burners, and a finish of some sort on the stove. The kitchen is going to be primarily yellow with red and black accents. On the wall opposite the counter and appliances is going to be a baking day hutch from my zibbet shop. The window is a bay and I plan to have a small dining area there.
This wallpaper and border were already in the room. I really like them so I'm going to make this a baby girl's room. Her dresser turned out well, I think.
The kitchen cupboards and appliances before painting - at this point they have a coat of gesso.
The shelves on the counter next to the fridge will be mounted on the wall. The refrigerator is a paper covered block of balsa. The rest was made by bashing Michael's hutches.
This is after the paint treatment for the cupboards. I still need to finish the appliances and countertops. The cabinets need knobs, too.
Farmhouse sink and range in the same unit. There's never quite enough space in a dollhouse kitchen but this works pretty well. I still need faucet, burners, and a finish of some sort on the stove. The kitchen is going to be primarily yellow with red and black accents. On the wall opposite the counter and appliances is going to be a baking day hutch from my zibbet shop. The window is a bay and I plan to have a small dining area there.
Labels:
1:12 scale,
bargain,
bedroom,
French country,
kitchen,
nursery
It's a start
I gave a warm, aged finish to the stark white plaster walls that the house came with. The living room is off to a good start on a French country feel. I am planning to make a sofa with black and cream toile and a chair in dark red gingham. The drapes will be toile as well..
My husband got me some of the Hobby Lobby unfinished pieces for Christmas as well as some Michael's hutches. These will get put to use in this house. I found some stickers today at Hobby Lobby to use as carved effects on several of these pieces. You'll also notice that I gessoed over the wallpaper in this room. It wasn't going to come off and it wasn't what I envisioned so this was the best way to handle it.
This is after a primer coat on each piece. Stay tuned for finished pieces soon!
My husband got me some of the Hobby Lobby unfinished pieces for Christmas as well as some Michael's hutches. These will get put to use in this house. I found some stickers today at Hobby Lobby to use as carved effects on several of these pieces. You'll also notice that I gessoed over the wallpaper in this room. It wasn't going to come off and it wasn't what I envisioned so this was the best way to handle it.
This is after a primer coat on each piece. Stay tuned for finished pieces soon!
Tuesday, July 15, 2014
Wow! Just....wow! (A New Project!)
My friend found an amazing bargain for me today at a local consignment shop. She found a partially built Allison by Artply complete with instructions and the rest of the kit.
There are also ten kinds of wallpaper - some actually is dollhouse wallpaper and some is tiny print 1:1 paper. On top of the rolls of paper is a package of chair rail and rolled with the paper is a piece of pink carpet.
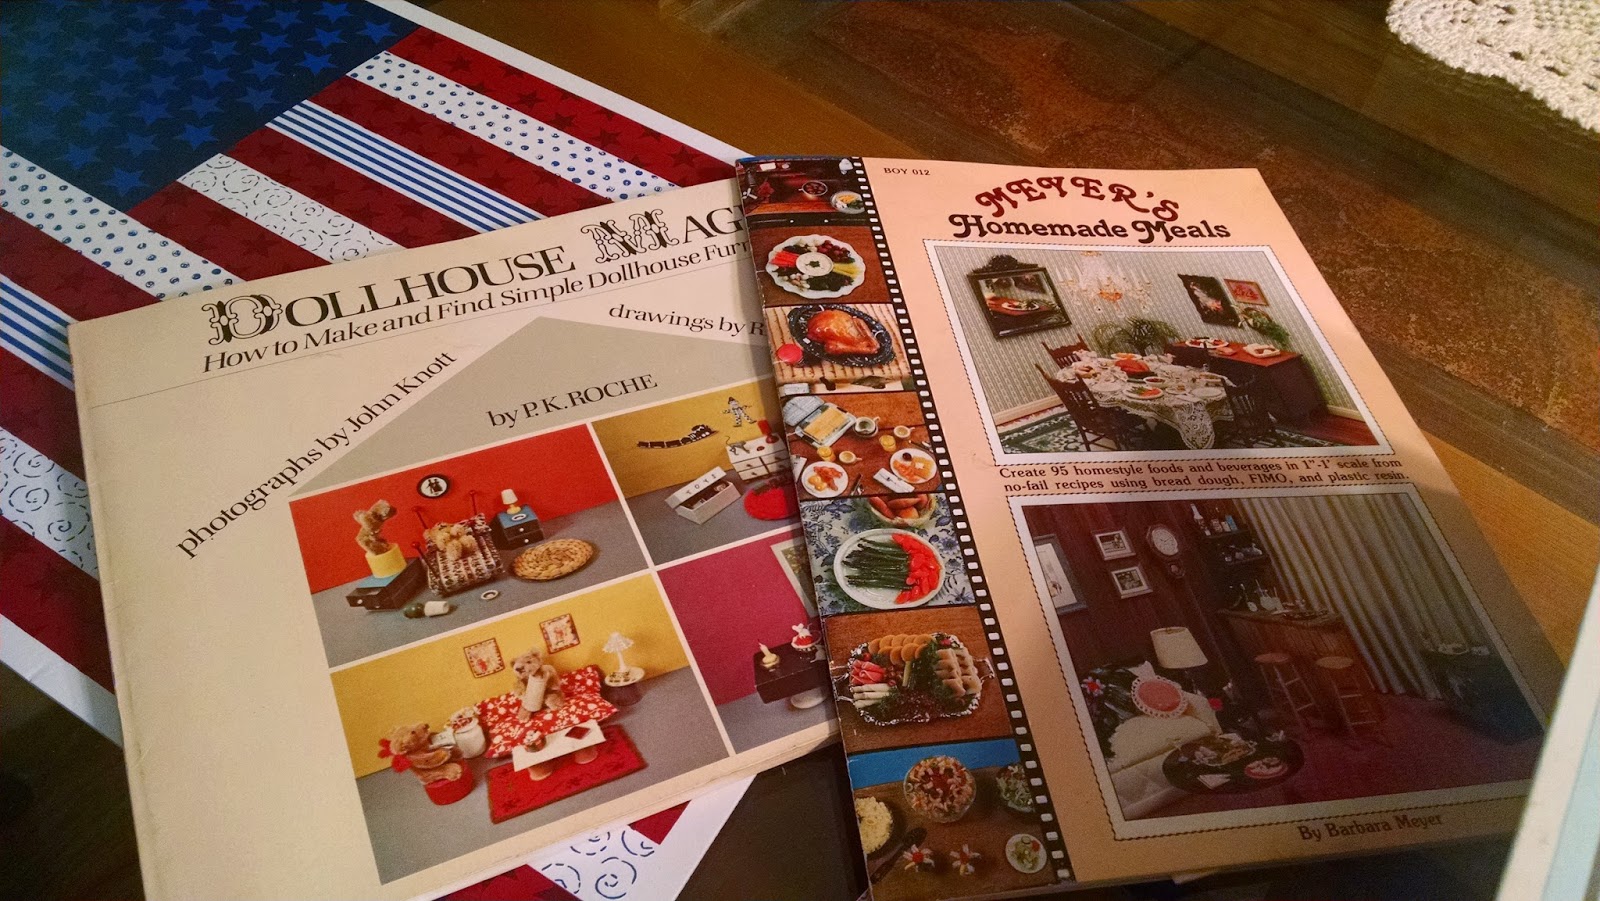
These two books on making dollhouse miniatures were included.
There are two types of shingles - regular wood ones and a package of cardboard fishscale strips. Also, look at all of the fancy railing!
It looks as though the whole kit is here. There are also some miscellaneous bits like stair spindles.
And here's the proof on the cost. I am amazed and very excited.
There are also ten kinds of wallpaper - some actually is dollhouse wallpaper and some is tiny print 1:1 paper. On top of the rolls of paper is a package of chair rail and rolled with the paper is a piece of pink carpet.
These two books on making dollhouse miniatures were included.
There are two types of shingles - regular wood ones and a package of cardboard fishscale strips. Also, look at all of the fancy railing!
It looks as though the whole kit is here. There are also some miscellaneous bits like stair spindles.
And here's the proof on the cost. I am amazed and very excited.
Labels:
1:12 scale,
Allison,
Artply,
bargain,
dollhouse kit,
one inch scale
Wednesday, July 9, 2014
Henry is moving on...
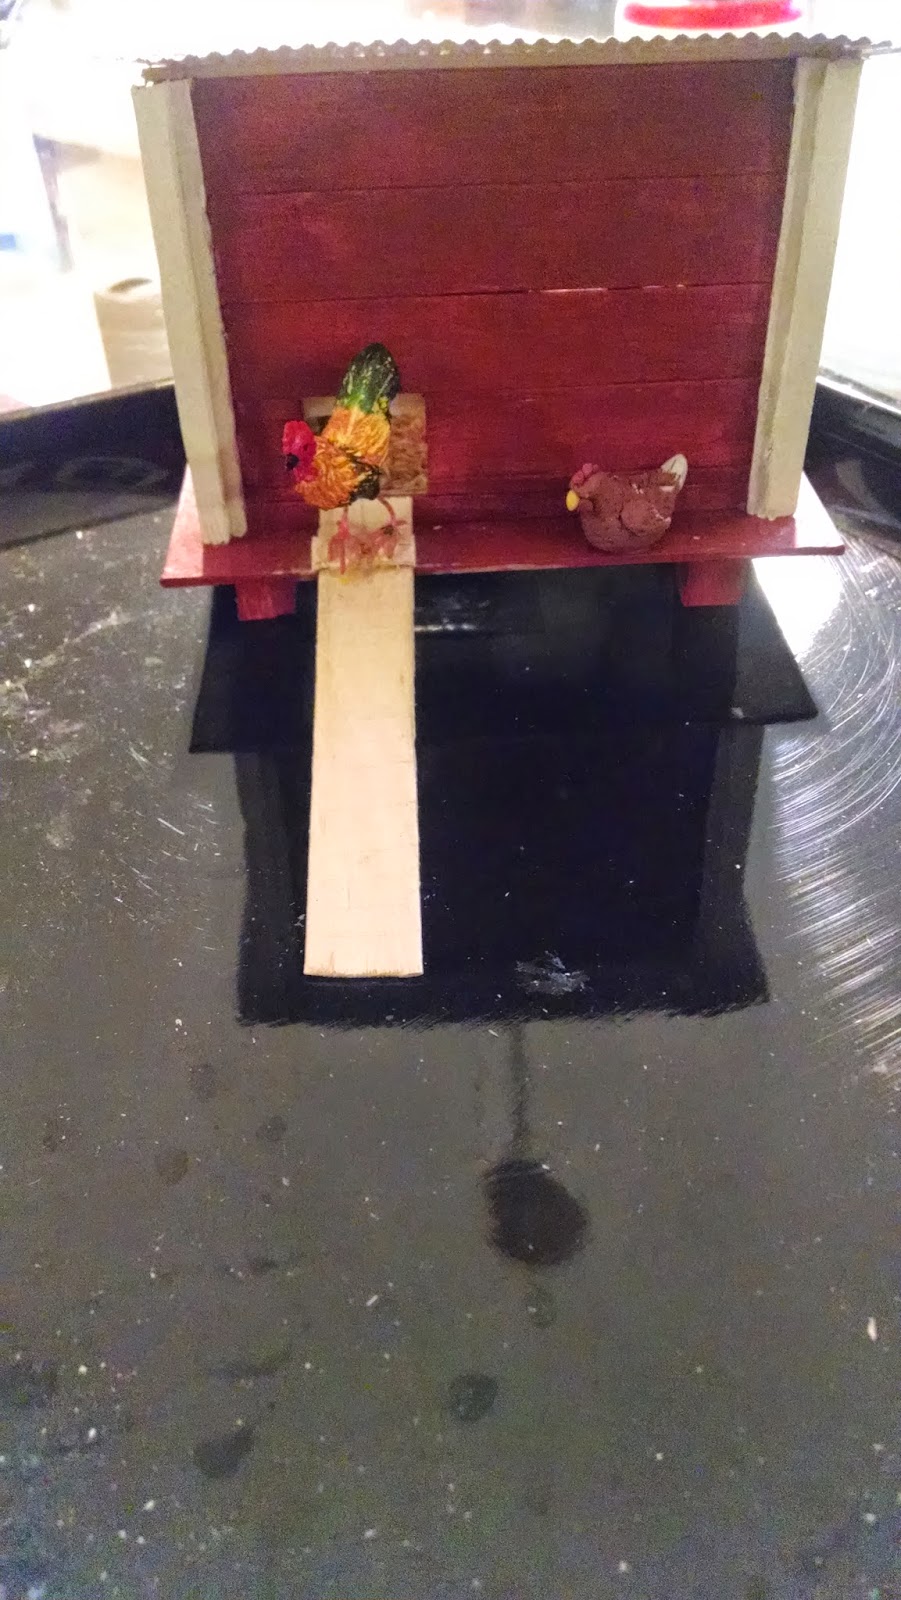
And that means that Fred, Wilma, and all the other pullets will be a lot less stressed. Henry (a Gold Laced Wyandotte) is going to be a pretty rooster but he's not very nice. I have someone interested in him so he should be leaving this weekend.
That inspired me to change the rooster on the Grand Boardwalk (mini version) to look like Fred, our Golden Polish cockerel. I'm really pleased with the results. What do you think?
Labels:
1:12 scale,
chicken,
chicken coop,
cockerel,
Golden Polish,
rooster
Sunday, July 6, 2014
The Crooked House Layers Club - mini style
Warning: This is a picture heavy post! I'd been thinking about making a mini chicken coop and run since shortly after we finished our real one. I had one of the smallest sized paper mache houses from Hobby Lobby that looked like I could make work. I didn't use the roof that came with the house at all. I cut the sides on an angle so I could have a sloped roof like our real coop. I made all the hens. There's Electra in one of the nest boxes.
This coop has a metal roof with a skylight. The real one isn't quite that cool, LOL. I even made the Crooked House sign in mini.
Here's Aurora resting on the veranda and rooster, Henry, on the Grand Boardwalk. {Hubby's names. ;-)}
Inside, one of the Spice Girls is enjoying her dinner. I can't tell all the Buff Orpingtons apart yet so they are collectively The Spice Girls. One of them has dark speckles all over the tips of her tail feathers. She's Pepper.
Here's a progress shot of the inside. I made the feeder and waterer from small and large dessicant capsules from medication bottles. The chicken feed was made with the stuff inside the capsule mixed with paint.
Here's the window side of the mini coop. You can see the real one in the photos below. It isn't an exact copy but I think I caught the "flavor" of the real one in my mini version. The next step will be making the mini chicken run and then trying to replicate some of our more exotic chickens in mini. I'm not sure how I'll pull that off. ;-D
This coop has a metal roof with a skylight. The real one isn't quite that cool, LOL. I even made the Crooked House sign in mini.
Here's Aurora resting on the veranda and rooster, Henry, on the Grand Boardwalk. {Hubby's names. ;-)}
Inside, one of the Spice Girls is enjoying her dinner. I can't tell all the Buff Orpingtons apart yet so they are collectively The Spice Girls. One of them has dark speckles all over the tips of her tail feathers. She's Pepper.
Here's a progress shot of the inside. I made the feeder and waterer from small and large dessicant capsules from medication bottles. The chicken feed was made with the stuff inside the capsule mixed with paint.
Here's the window side of the mini coop. You can see the real one in the photos below. It isn't an exact copy but I think I caught the "flavor" of the real one in my mini version. The next step will be making the mini chicken run and then trying to replicate some of our more exotic chickens in mini. I'm not sure how I'll pull that off. ;-D
Subscribe to:
Posts (Atom)